
To the non-gamer, all this joy just for rules for a miniature game might be really sad to witness, but as a hobbyist and one that loves converting and scratch-building, etc, this was as if paradise had opened its gates.
I started working on a captured Pounder for my Axis, then decided to make it for my SSU and still wasn't too happy with it. Thats when I saw Isaiah Burgess' work on one of the Facebook group ( Lets see if this works ) = a beautiful Otto, a Sino-Soviet Union's KV-47 captured by Axis and re-armed with weapons from a Hans.
That same night I played a game versus Axis ally Guillaume Juneau (aka Yaum) who showed me a stunning half-track he had painted (Really Nice Half-track here, click click!! ) with a sick rust effect.
Thus the following morning my Axis troops were stealing a KV-47 from the dangerously close (in their glass display) SSU troops I own.
OTTO TUTORIAL: FROM START TO FINISH
 |
| a.k.a. Lets put some paint on that! |
 |
| Driver is from the Bunker Crew. |
 |
| Couple of Accessories from Tamiya left-overs I had. |
Step 1: The Base (Part 1)
I used to never do a single base for any of my models...I couldn't be bothered to play with sand and glue. Now that I've discovered Vallejo's Sandy Paste I've been more and more interested in trying to base my models and represent the environment they are in. (I sound like a commercial...but if you don't like basing, give the Sandy Paste a try!)

I did the base by placing bits of Cork then putting some Sandy Paste (Vallejo) to give it some texture and finally by quickly airbrushing ''Burnt Umber'' (VAL71.040) and then a little ''Cam. Light Brown'' (VAL71.035). Don't worry, this is not the finished base, I just sanded and painted it so I could glue my Otto on it for ease of painting.
Step 2: The Rust + The Camo

I airbrushed the color ''Rust'' (VAL71.080) everywhere on Otto. Just make sure to cover the light and other transparent parts.

Then, I applied a liquid mask (here ''Maskol'' by Humbrol) to places where I wanted rust spots. You can definitely do Salt Weathering and I would have done it...had I remembered to pick some heavy sea salt.
At least it allowed me to try Maskol and I must say it did its job.

After 20mins, when the Maskol is dry, I then airbrush my Camo, starting with ''Dark Yellow'' (VAL71.025)
You can see the Maskol (the little blotches) under the coat of Dark Yellow.

I then airbrush stripes of ''German Green'' (VAL71.020) on the model. (Try it, its made with real bits of germans!!!)

To finish my camo I airbrush stripes of ''Cam. Light Green'' (VAL.71.006) inside the stripes of ''German Green''.

Because I felt fancy and wanted to do some markings on my Otto in order to avoid as much 'friendly fire' as possible, I used masking tape to create lines on the Panzerwerfers' armor plates.

I then airbrushed ''Light Grey'' (VAL71.050) to create thge line. You can notice that when I removed the tape some Maskol went away with it, showing a little what 's coming up for the rust effect.

Using a sculpting tool (maybe not the best tool for the job, careful about scratching your model!!) I removed Maskol from Otto.

Looks like that with all the Maskol removed.

Then using a fine paintbrush (yes I take terrible care of them) I applied a mix of ''Menoth White Base'' (PIP93065) and the ''Dark Yellow'' I had used on parts of the paint chip where light would fall and highlight the yellow parts of the camo to give it more depth.

I did the same using ''Wurm Greem'' (PIP93038).

Then I apply black paint to the top of the paint chips where light would'nt easily go.

It looks like that.

As you can notice, I did A LOT of rust on that poor Otto. I must admit I didn't think about how much rust I was putting when I was applying the Maskol and ended up making a really poorly maintained Otto.
Don't forget kids: less is better.

I painted the top of the Granatewerfer and Panzerwerfer in ''Gretchin Green'' a sadly discontinued color I'm addicted to.

This is just a fun picture to fantasize about ''riders'' I wish Paolo made some models of Grenadiers and Soviets ''tank riding'' so we can put them on vehicles. I'll probably order the new Justine.CO soon from Dust Studio to give them a try.
Step 3: Decals

Next, I applied Decals from Dust Studio. I love the ''Achtung'' one as not only its a great addition to an ammo box, it also instantly identifies the model as German.
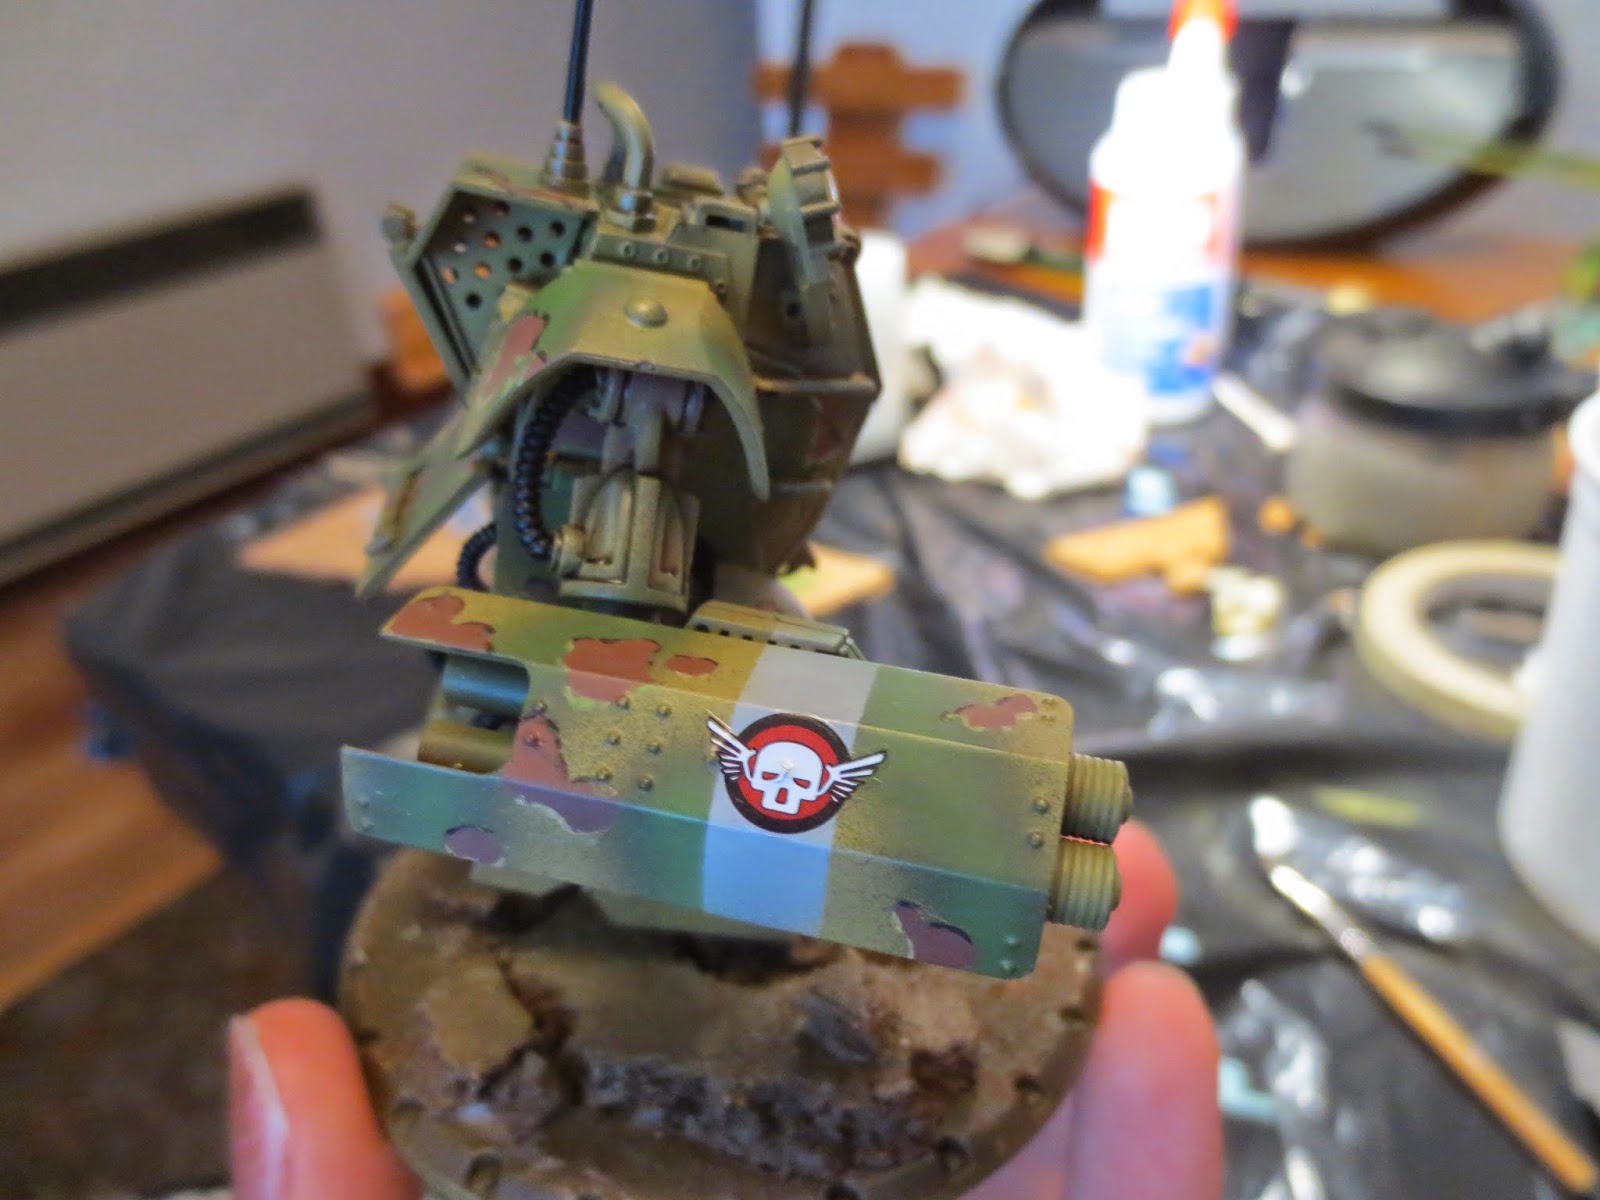
I decided to eschew the ''German Cross'' and go for a symbol I for some unknown reason, really wanted to try.

Instead of giving a number like I do for my regular german vehicles, I gave this Otto a letter. (it comes from a GW decals sheet).
Step 4: More Weathering.

Despite owning pigments, one of my favorite technique for weathering is the sponge weathering. I take a cheap sponge, the color I want for my paintchips, here ''Gun'' (VAL71.072) and then...
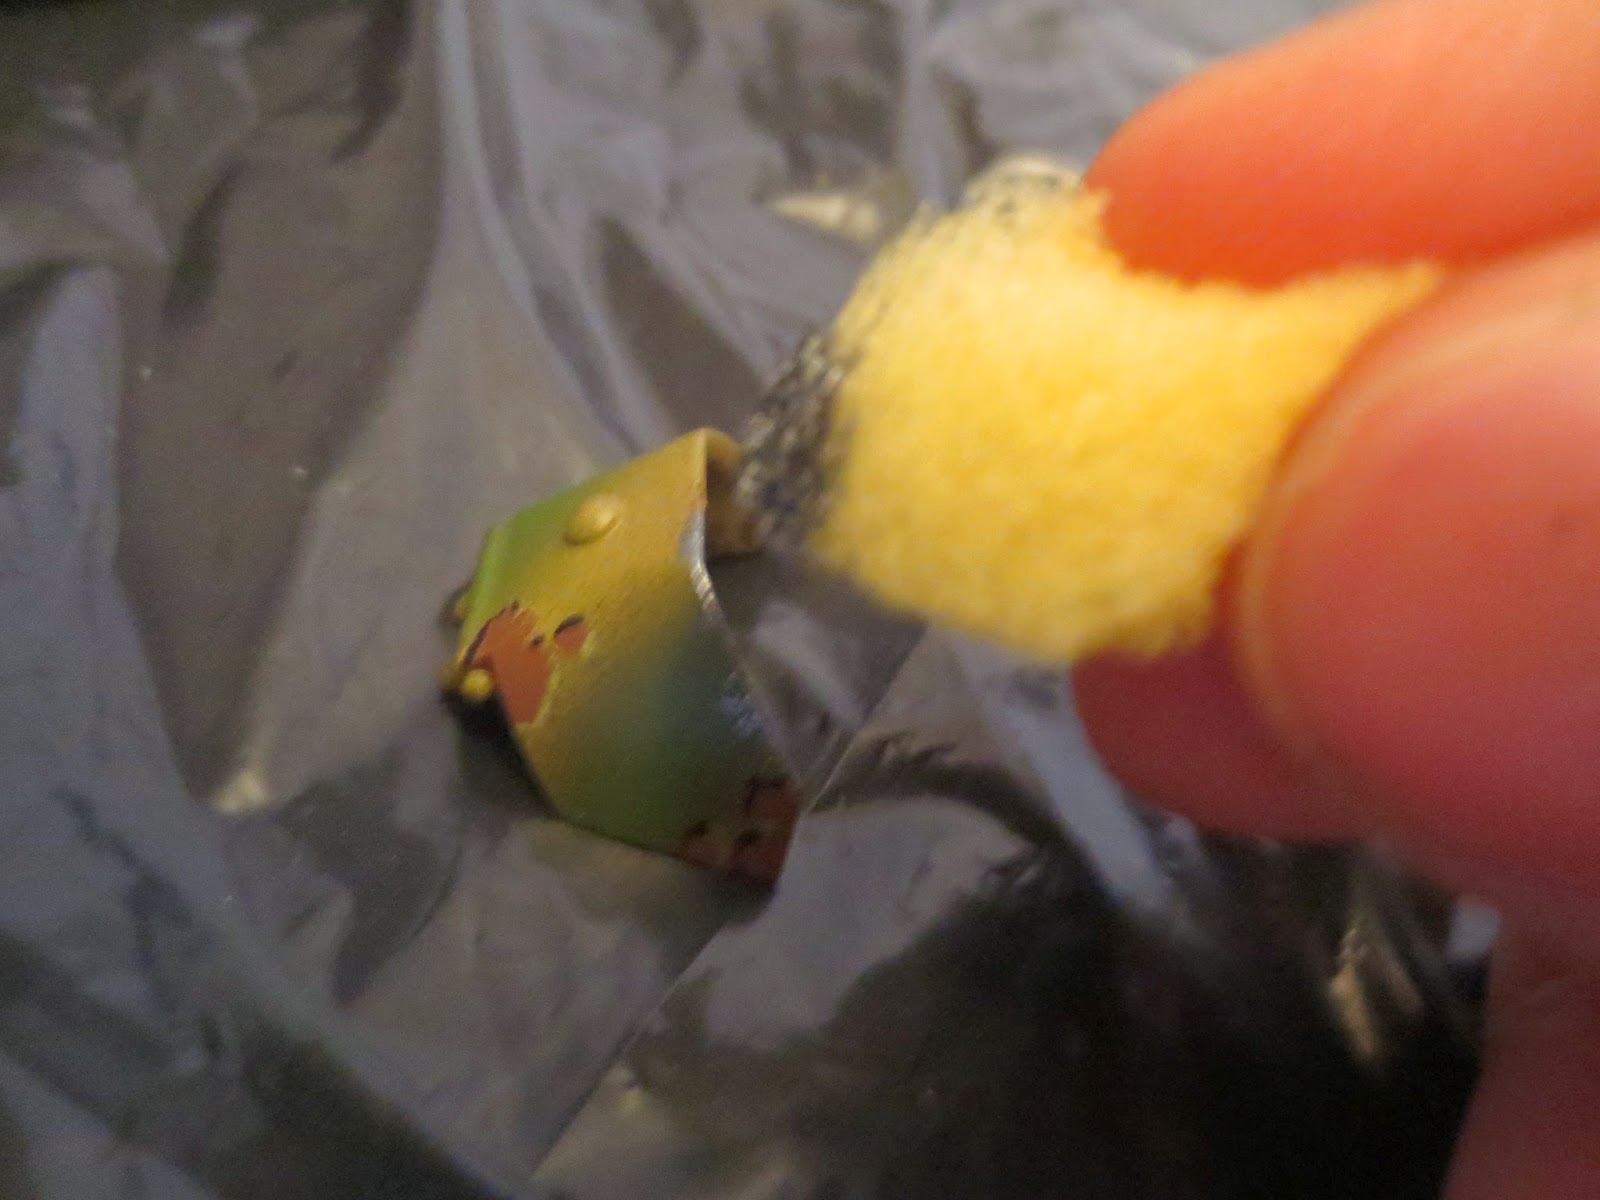
I apply on the edges of metallic parts which would have entered in contact with something or simply chipped over time.

Usually my last step, I apply (using the sponge technique) ''Umbral Umber'' (PIP93028) on the same edges I applied my metallic color.

It should look roughly like that. Don't put too much but darken the edges and make them look like dirty/muddy/rusty.
Step 5: The Pilot

I took one of the weapon crew member I thought would look good and removed his base. Otto being a scout vehicle, I took the one with the binoculars.
Sadly I didn't take pictures on how I painted it but I do remember the steps.
For the Camo I tried to do an 'Erbsenmuster 1944' (aka Peadot Camo), for pictures and info check out Artizandesigns .
(I now realize I used a wrong color and my camo is off...oh well! It'll be the 1947 version I guess)
To do a Erbsenmuster 1947:
1: apply a basecoat of ''Trollblood Highlight''
2: Make medium-large dots of ''Traitor Green''
3: Make medium-large dots of ''Cryx Bane Base'' touching the dots of ''Traitor Green''
4: Paint really small dots of ''Wurm Green'' everywhere, leaving space for more dots of other colors.
4: Paint really small dots of ''Trollblood Highlight'' inside the ''Traitor Green'' and ''Cryx Bane Base'' medium-large dots.
5: Paint really small dots of ''Traitor Green'' inside the ''Trollblood Highlight'' basecoat areas and ''Cryx Bane Base'' medium-large dots.
6: Paint really small dots of ''Cryx Bane Base'' everywhere save for the medium-large dots of ''Cryx Bane Base''
Should look like this:

The coat was done using a mix of ''Dark Yellow'' and ''Menoth White Base'', I tried reproducing by head the technique I had done with my Sturmpionere . I didn't do everything exactly similar and arrived at a slightly different result but was pleased with the yellow coat nonetheless.
Step 6: The Base (Part 2)

Using a (sacrificial?) paintbrush (here: don't worry, its one of those crappy 'Game and Gears' one that I got from a friend) I apply a mix of white glue and wate on the base where I want grass to go.

I then use a spoon to sprinkle some grass mix on the glue. (here: ''Fine Turf, Weeds T1346'' from Woodlands Scenics)

While the glue is still wet, I sprinkle a second color. (here: ''Blended Turf, Earth Blend T1350'' from Woodlands Scenics)

I then add ''Meadow Flowers'' from Army Painter (but technically the Army Painter stuff is just a repack of Mininatur, check out Mininatur!!)

Last but not least, I added little fallen leaves on the base, I wanted my Otto (and for those who noticed, Captured Natasha) to be on woodlands bases.
Step 7: Enjoy!
Here are pictures of my completed Otto. (Sorry for the quality, it was really sunny outside but too dark inside)


Thanks to Isaiah for the inspiration (you truly have a beautiful Otto!) and Guillaume Juneau for his rust technique (his is better as he uses more than one color and probably pigments...I'll experiment with that in the future)(: check out Guillaume Juneau's painting services if you want sick paintjobs on your favorite models/vehicles )
I hope you liked the tutorial and it made you find new things (be it techniques, nice color shades or companies), feel free to leave a comment.
Guillaume, ou as tu achete ton vallejo sandy paste ?
ReplyDeleteGamers' Vault, the store I work at. We can get a lot of stuff so if you don't see it you can always ask us to order it for you. ;)
ReplyDelete